(Buyer) Create Quick RFQ – General Information
When Create Quick RFQ title under the Quick RFQ main title is clicked, five setup steps are displayed on the opened page. All necessary steps for event setup must be followed sequentially to completion.
The areas to be filled in the "Quick RFQ Information" section are indicated with an asterisk. If any of the specified areas are incomplete, the next step cannot be proceeded to.
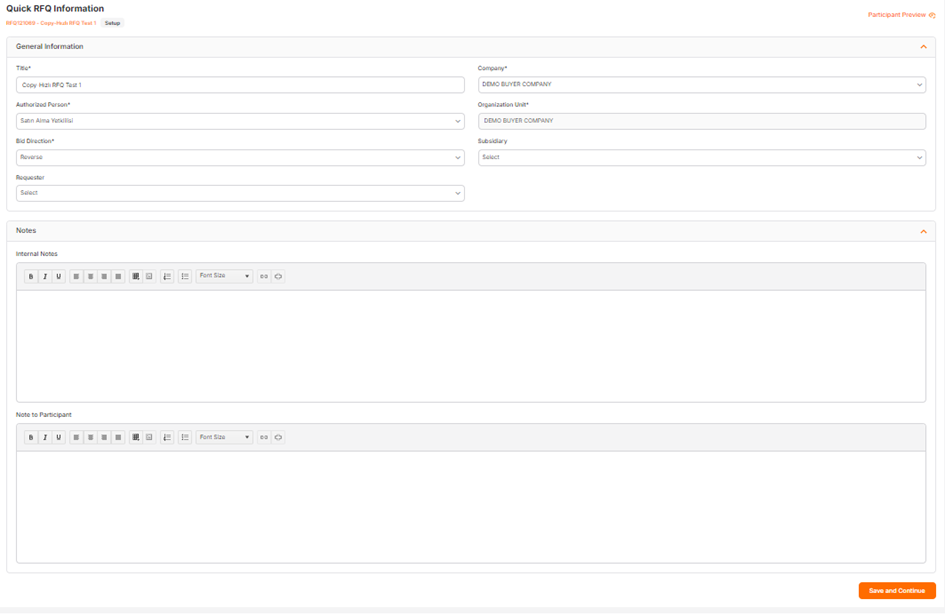
Title: The title of the proposal. The title defined in the relevant area is used in listing screens and email announcements.
Company: The companies where the user performing the action is defined are listed in the relevant area. In cases where users have authorization for only one company, the relevant area displays information for the single company and the relevant company is selected as default.
Authorized Person: The information of the user performing the action is automatically assigned to the relevant area. Users affiliated with the company are listed, and changes to the authorized person can be made.
Organization Unit: The organization unit is automatically assigned based on the company to which the user performing the action is affiliated.
Bid Direction: The area where the bid direction selection is made. For Purchasing Events, "Reverse" should be selected, and for Sales Events, "Forward" should be selected.
Subsidiary: If the relevant RFQ is associated with a subsidiary, a selection can be made from the subsidiaries listed in the system.
Requester: If the relevant RFQ was requested by a user in the system, the corresponding user is selected from the dropdown list.
Internal Notes: It is the area where information is entered to be shared with users affiliated with the company. Notes written in this area cannot displayed by participants.
Note to Participant: It is the area where information is entered to be shared with participants. Notes written in this area can displayed by participants.
To proceed to the Line Item List step, click the "Save and Continue" button. At this step, a Quick RFQ is created. It is in the Setup status. A singular ID number is assigned by the system for each created event.

To proceed to the Event Settings, the relevant areas must be filled in the "Quick RFQ Information" step and the Save and Continue button must be clicked.