Creating a REQ
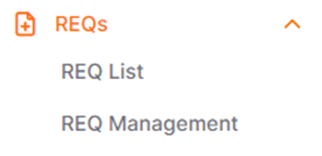
To create a request in the Promena system, you need to click on the REQ List button under the REQs heading on the left side of the screen.
Click on the "Create REQ" button located at the top right corner of the page.

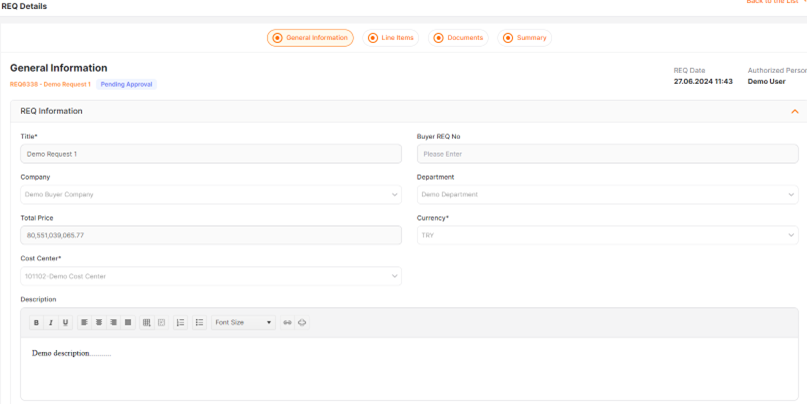
Only the fields marked with a red star in the list are required to be filled in. On the page, you may encounter the following;
· Title: This is a mandatory field where the title information of the request must be entered.
· Buyer REQ No: This is the field where the request code information for the recipient is entered. It can be used to enter the request code defined in the ERP system in case of integration with ERP. It is not a mandatory field.
· Company: This is the field where the company information of the requester is automatically reflected.
· Department: This is the field where the requester’s organization unit automatically pre-selected.
· Currency: This is the field where the currency selection for the recipient can be made. The default currency is automatically pre-selected.
· Cost Center: This field where the cost center selection for the request is made. This field becomes mandatory if the recipient has at least one cost center defined under them.
Description: · This is the field where the descriptions related to the request are entered. A visual, link, or text can be added and formatted as necessary for the request.
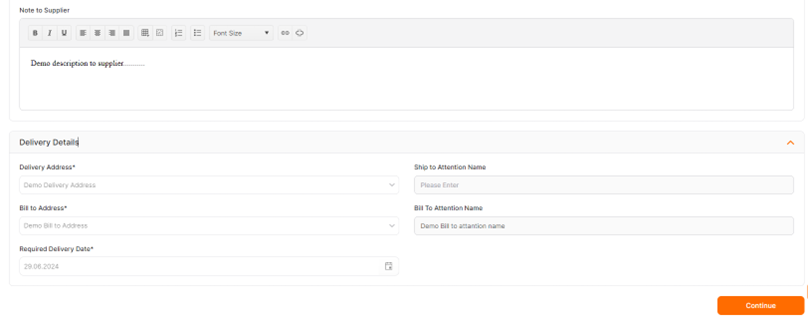
· Note to Supplier: This is the field where notes that the supplier needs to see regarding the request can be written.
· Delivery Address: This is the field where the delivery address selection is made. If there is only one address available in the user's organizational unit who will fulfill the request, it is automatically reflected here.
· Delivery Terms: This is the field where the contact information for delivery-related inquiries is entered.
· Bill to Address: This is the field where the billing address selection is made.
· Bill to Attention Name: This is the field where the contact information for billing inquiries is entered.
· Required Delivery Address: This is the mandatory field where the desired delivery date is entered.
Fill in the information and click on the Continue button at the bottom of the page. At this stage, an ID number is assigned to the request, and your request is in the Setup status. The tabs for Item
Information, Documents, and Summary at the top will be displayed. Completing the Item Information tab is mandatory to finalize the request in the Setup status.
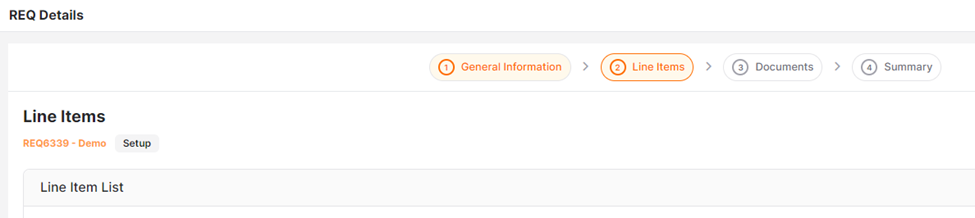
On the General Information page, you can view the details of the created request information, and changes can be made to the request while it is in the Setup status.
The items related to the request can be edited from the Line Items page. To add a new item, click the Add Product button, and the following three options will be displayed based on the roles of the recipient company or the user's permissions:
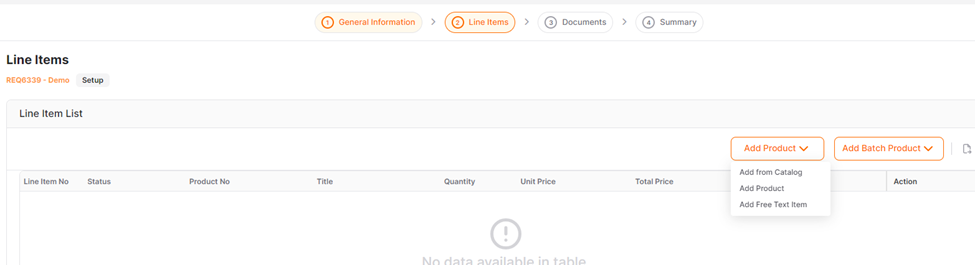
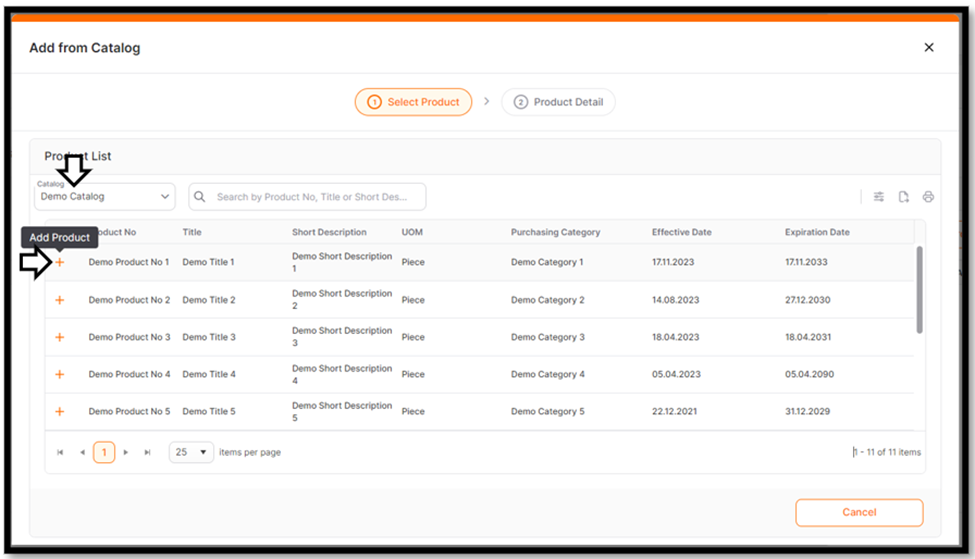
Add from Catalog: The Catalog section in the opened window contains a list of catalogs that the user can view. By selecting a catalog, the list of products with defined prices from suppliers can be viewed in the general information section for the selected catalog. Select the desired product and click the Add Product button.
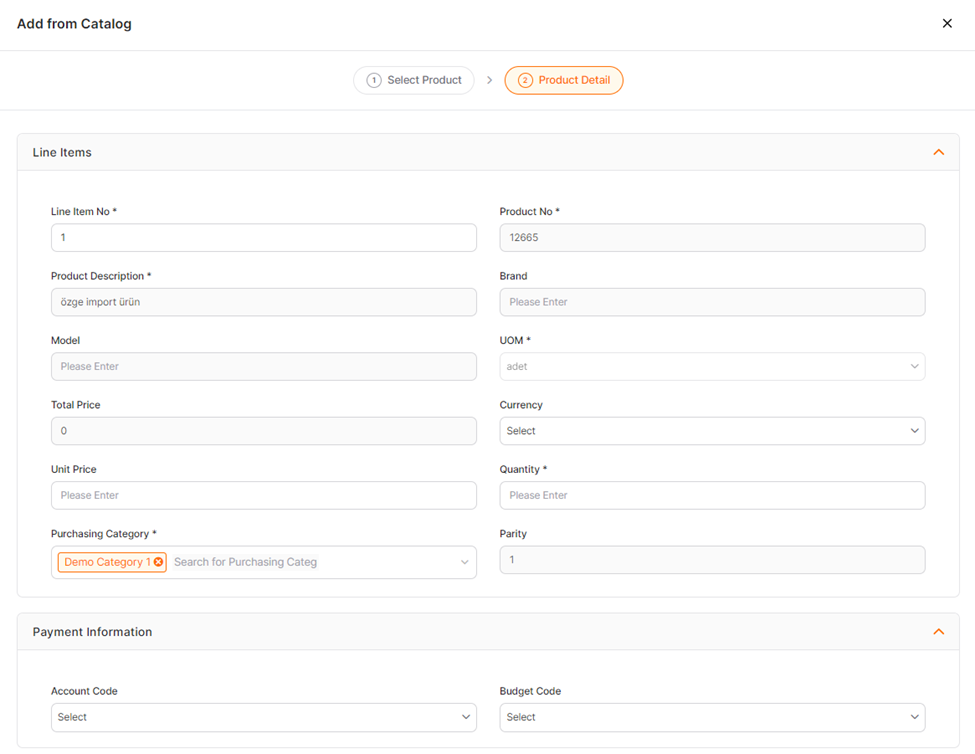
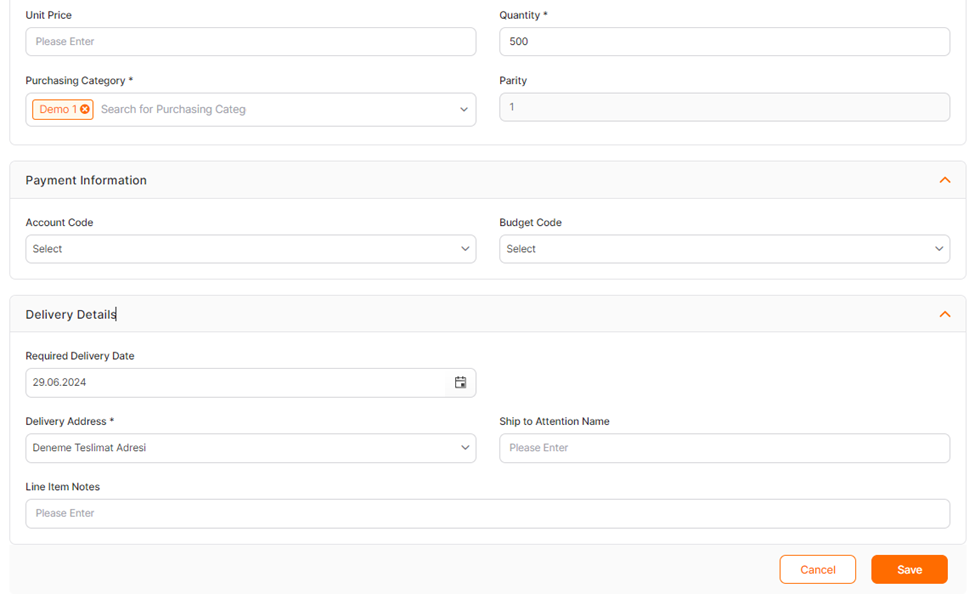
On the opened page, the product details should be filled in, and the Save button located at the bottom right corner of the page should be clicked.
Fields marked with an asterisk (*) are mandatory fields.
Click the link below for further information about REQ List menu.
Add Product: In the opened window, the list of priced products from the selected supplier is displayed in the general information section. Click the "+" button at the beginning of the product you want to add to the request.
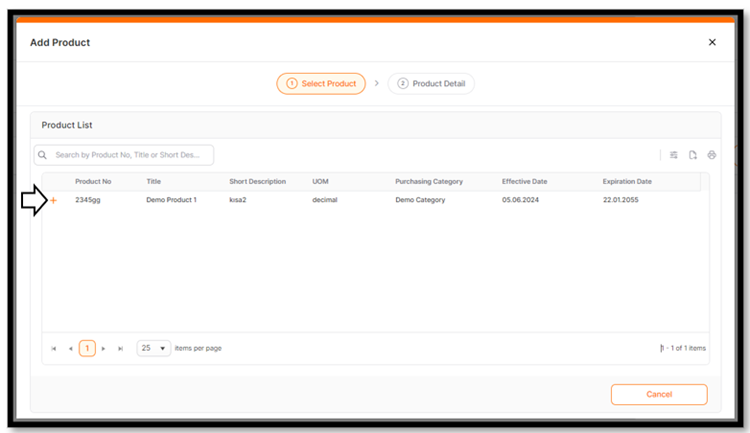
On the opened page, the product details should be filled in, and the Save button located at the bottom right corner of the page should be clicked.
Fields marked with an asterisk (*) are mandatory fields.
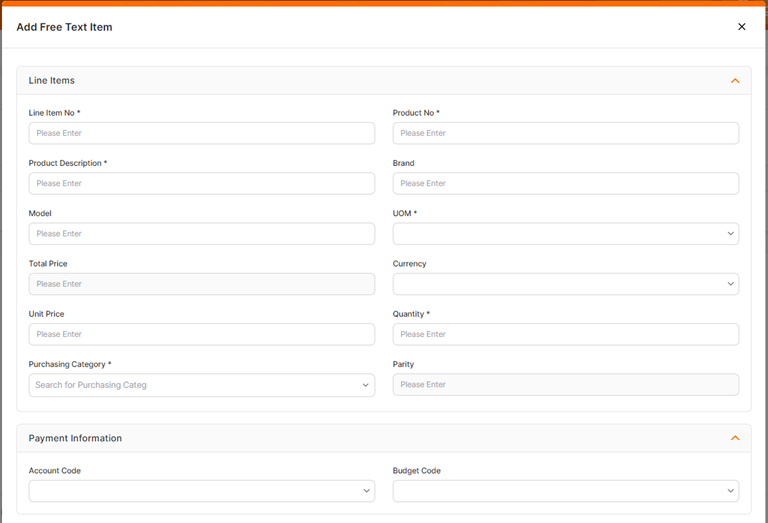
Add Free Text Item: The option to manually enter the information of the item to be added to the request is available.
The following window opens for products added from the catalog, product list, or as freetext. Only for freetext items, all fields can be edited and viewed accordingly.

Add Batch Product: The option to enter the information of the item to be added to the request in bulk is available.
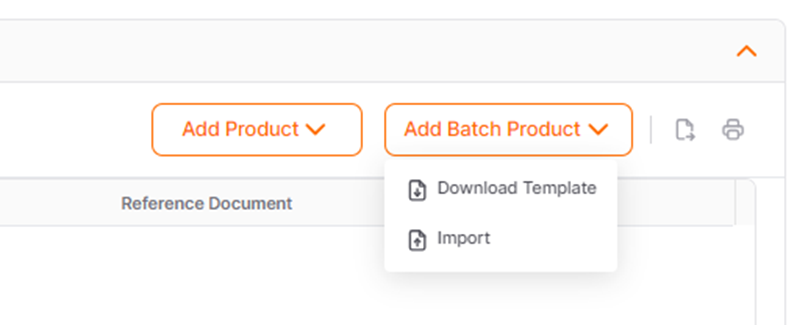
After downloading and filling out the template, it should be saved and then uploaded to the system using the Import method.
Note: For priced products added from the catalog or product list, fields such as Product Description, Product Number, Unit Price, Currency, Purchasing Category, Measurement Unit, and Exchange Rate are automatically populated. However, for freetext items added, these fields are open for modification by the user creating the request.
Enter the Delivery Contact Person and Item Note information for the item, then click the Save button.
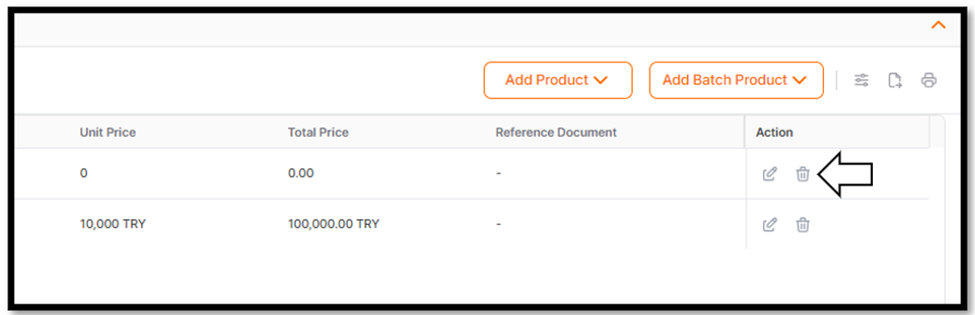
If you want to update the information for an item, click on the pencil icon at the beginning of the item row, make the necessary changes, and then save it. If you want to delete the item from the request, click on the trash can icon to delete the item.
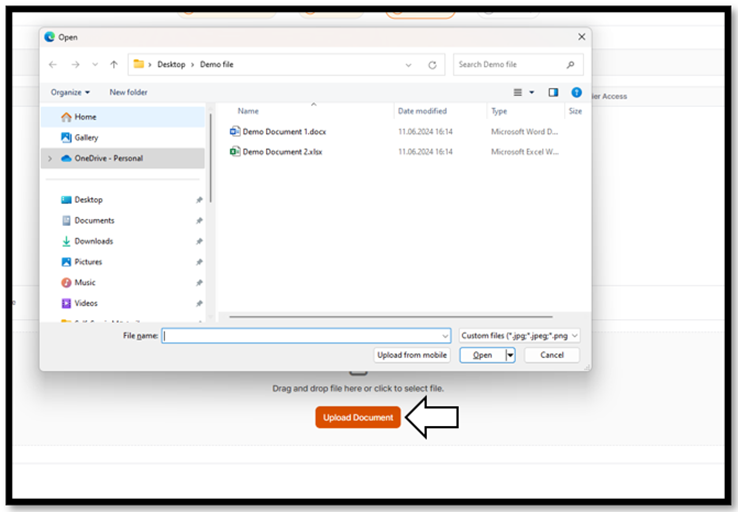
To add a document to the request, the Item Information step must be completed and the Continue button clicked within the request.
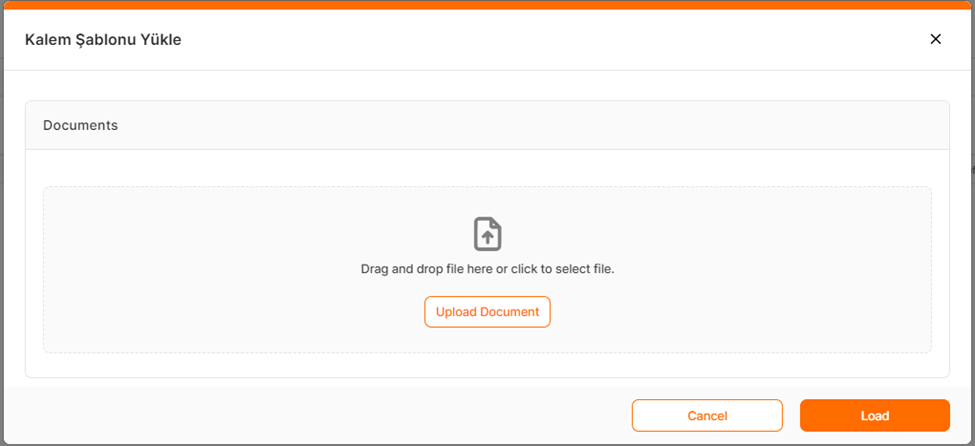
On the opened page, select the file by clicking "Upload Document" or drag and drop it onto the page to upload the necessary file from your computer.
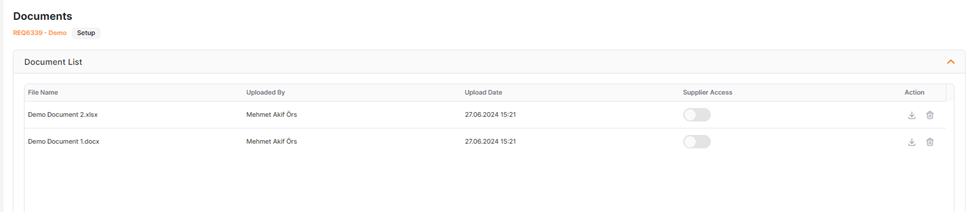
The uploaded document's name, upload date, and the name of the authorized uploader can be accessed. To delete the uploaded document, click on the trash can icon. To download it to your computer, click on the downloadicon. Whether the document can be viewed by suppliers can be determined by activating or deactivating the Supplier Access button in the Supplier Access column. When it is active, suppliers can view the documents; when it is inactive, suppliers cannot view the documents.
To proceed to the Summary page, the Documents step must be completed and the Continue button must be clicked.
In the Summary menu, the information created within the request can be viewed in a general overview. To proceed, click the Submitbutton located at the bottom of the page. The request can then be sent to the necessary approval stages as the next step.
Note: Requests remaining in the Setup status can only be viewed by the user who created the request and have not been sent to any approval stage yet. The Submitbutton in the Summary menu must be used to send the request for approval.
 Promena
Click the link below for further information about PO Tracking menu.
Promena